Well, mostly indigo, plus some other spectacular natural dyes that are used to color the threads of these twelve (12) beautifully back-strap loom woven scarves and shawls. Here, you will find alder wood bark (palo de aguila), wild marigold (pericone), banana tree bark, purple snail (caracol), coyuchi (native brown cotton), and cochineal (red bug) dyes. These pieces, from my personal collection, are from Michoacan and Oaxaca. All are in pristine condition, most never worn. (Remember, I’m not opening a textile museum!) I’ll explain in more detail with each piece. One size fits all! Perfect for holiday gifting — for her, him, they!
How to Buy: Send an email to norma.schafer@icloud.com and tell me the item(s) you want to purchase by number, your email, your mailing address and which payment method you prefer: 1) Zelle bank transfer with no service fee; 2) Venmo or 3) PayPal each with a 3% service fee. I will send you a request for funds and then add on a flat rate $14 mailing fee. Happy to combine shipping. Thank you. Note: Thank you for understanding that all sales are final. Please measure carefully!


SOLD 1. Indigo shawl embellished with caracol rare purple snail dye from the Oaxaca coast village of Pinotepa de Don Luis, created by the famous Tixinda cooperative led by Don Habacuc. This is an ample shawl that measures 23″ wide x 80″ long. 100% cotton. All natural dyes. $265.


SOLD #2. This was a prize winner at the Dreamweavers January 2021 expoventa in Puerto Escondido. It is a handwoven scarf made on the back strap loom with threads dyed with indigo, coyuchi, caracol purpura, and fuschine. Measures 9-3/4″ wide x 78″ long. 100% cotton. $165.


SOLD #3. Master weaver Roman Gutierrez from Teotitlan del Valle wove and dyed this shibori shawl colored with wild marigold and over-dyed with indigo. It measures 22-1/2″ wide x 76″ long. 100% cotton. $145.


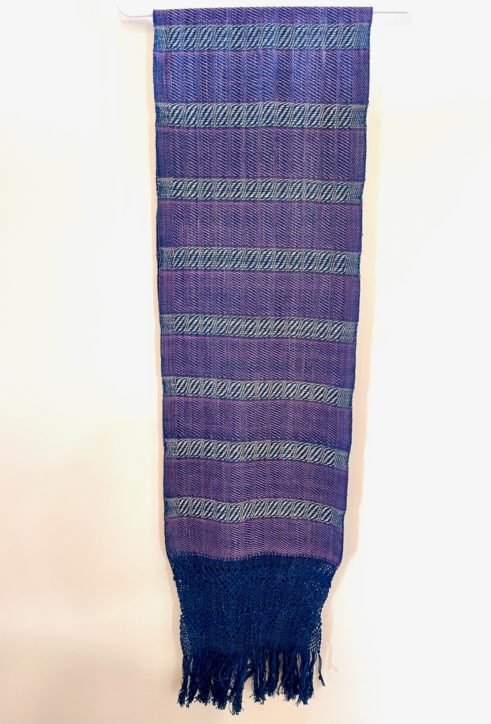
SOLD 4. Another Tixinda cooperative shawl, a real beauty, woven with indigo, caracol, coyuchi and cochineal. Measures 26″ wide x 110″ long. $285.


SOLD 5. From the Mixe Oaxaca mountain village of Santa Maria Tlahuitoltepec, a very fine pedal loomed scarf created by Artefer, dyed with alder wood and banana bark. Measures 12″ wide x 84″ long. Wrap it around the neck twice for super comfort. $125.


#6. In Zinacantan, Chiapas, they create these beautiful hand-woven neck scarves — fold in a triangle and wear like a bandana! The pompoms serve as ties! Red, black, and peach. Great color combo. Not natural dyes. 25″ square. $75.


SOLD #7. This herringbone design from Tlahuitoltepec is made on the pedal loom with cotton threads dyed with indigo. Gorgeous scarf. Measures 12″ wide x 84″ long. $125.


8. Another fine shawl, lightweight and perfect for winter warmth from Tlahuitoltepec. It is woven with a cotton warp and wool weft. The cotton is dyed with banana bark and the wool weft is indigo. Measures 24″ wide x 96″ long. Wrap it around your body or use as a throw! $225.


9. What can I say? We will miss her. Recently deceased Cecelia Bautista Caballero wove this shawl in her village of Ahuiran, Michoacan. She hand tied the knots in the 13″ punta (fringe), too. I bought this from her when I visited her home in 2019. You can have a piece of Mexican weaving culture history with this shawl. Commercial dyes. A masterful textile, rare and beautiful. Measures 32″ wide x 110″ long. $445.


SOLD 10. This textile is a traditional technique from the coastal Oaxaca mountain village of Santiago Ixtlayutla, near Pinotepa de Don Luis, where I purchased it. The dye is fuschine, which some call cochineal, but it isn’t. It is a synthetic dye that adheres to the silk designs woven as supplementary weft into the cotton. The dye brings out the figures of religious symbols and animals typical to the region. The bleeding of the dye is actually what it does and is considered part of the design. Very beautiful and psychedelic! Measures 24″ wide x 88″ long. $295.


11. From my collection, vintage African mud cloth textile dyed with indigo. Good vintage condition. Some wear. Measures 27″ wide x 96″ long. The 12″ fringes are hand-twisted. $95.


SOLD. 12. Patzcuaro flower garden shawl measures 27″ wide x 82″ long. Made on the back-strap loom in Tzintzuntzan, Michoacan, by Teofila Servin Barriga, the most famous weaver-embroiderer on Lake Patzcuaro. The flowers are all embroidered using French knots and other embroidery stitches. It is stunning. Measures 27″ wide x 82″ long. $385.


SOLD.13. This is a masterpiece from Malinalco, Estado de Mexico, where ikat weaving reigns. Camelia Ramos learned rebozo weaving from her father and has passed it on to her children. She is recognized by Fundacion Banamex for her outstanding workmanship. This rebozo, from her studio Xoxopastli, is woven with threads dyed in cochineal and indigo, a rarity for this type of work. The punta or fringe is triangular in the Colonial style preferred by the Spanish women who came to Mexico after the conquest. It takes three months to weave the cloth and another three months to hand-knot the fringes. Measures 31″wide x 100″ long. $425.
Thank you once again for browsing and shopping with me. I very much appreciate your support and your dedication to our Mexican artisans. -Norma